Prepare for University Studies & Career Advancement

Architecture

Architecture is the art and science of shaping the spaces we live in—spaces that must serve us practically, while also reflecting who we are, where we come from, and how we relate to the world around us. It draws on many disciplines, from computer aided design and visual storytelling to environmental science and cultural history. At its heart, architecture gives shape to the built environment, blending meaning, beauty, and function into the places where life unfolds.

Whether it’s a soaring civic building or a quiet family home, architecture expresses the spirit of a society. It reflects artistic vision, technological tools, financial realities, and shared values. Every project—be it a simple shelter or a sprawling city plan—challenges architects to weave creativity with constraint, and dreams with the needs of real communities.

Architecture plays a crucial role in responding to the world’s urgent challenges. As cities become denser and the planet faces rising temperatures, architects must design for sustainability and resilient infrastructure. With the help of new technologies, architecture can lead the way in building smarter, greener, and more adaptable spaces that respect both nature and community.

Yet architecture is more than bricks and blueprints. It speaks to memory, identity, and heritage. Through mindful design, we can honor cultural roots while embracing modern life. Students of architecture explore not just structure and style, but also art history, social change, and public policy—gaining a full picture of how buildings shape and are shaped by the world around them.

A career in architecture opens many doors: designing buildings, planning cities, protecting landscapes, advancing conservation, or creating digital simulations. It requires both artistic vision and precise thinking. With such a broad foundation, architectural education equips learners to meet the complex demands of our century with imagination and insight.

To explore how architecture is evolving around the globe, visit platforms like ArchDaily, the World Architecture Community, and the UNESCO World Heritage architecture list. These resources celebrate extraordinary work that blends innovation and tradition across continents and cultures.

Futuristic cityscape with sustainable skyscrapers and a modern eco-house surrounded by greenery.
A vision of sustainable urban architecture, blending futuristic skyscrapers with eco-friendly residential design and abundant greenery.
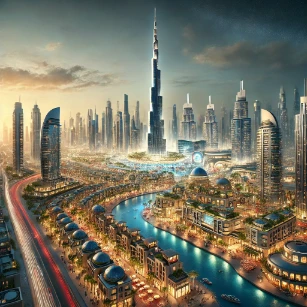
This conceptual illustration showcases a harmonious fusion of futuristic urban planning and sustainable living. In the foreground, a minimalist modern eco-house is nestled among lush trees and vegetation on a small island, highlighting green residential design principles. Behind it rises a dramatic skyline of towering, ultra-modern skyscrapers featuring glass facades and integrated vertical greenery. The buildings exhibit advanced architectural styles with sharp angles, organic curves, and reflective surfaces. This visual captures the evolving dialogue between high-density city development and environmental consciousness—ideal for topics in green architecture, smart cities, or urban sustainability.

Table of Contents

First-Year Architecture Studio: Core Skills and Projects

This studio spells out what students must actually do: draw, measure, model, iterate, annotate, and present. Each skill module links to a dedicated lesson with steps, drills, and pass criteria. Projects fold those skills into coherent, graded work.

A. Core Skill Modules (do these weekly)

1) Orthographic 3-View (Third-Angle)

Learn: third-angle quadrants; shared projectors; visible vs. hidden edges; minimal, non-redundant dimensions.

Minimum competency: Build the three true views of a given solid with correct alignment and the minimum complete set of dimensions.

Practice drills: 2 re-plates from scratch (clean start); one timed 25-minute pass.

Deliverable: One A3 sheet with TOP/FRONT/SIDE, lineweight legend, and scale note.

2) 3D Pictorial Systems

Learn: Cabinet, Isometric, Military; 1-VP/2-VP/3-VP perspective; how and when to pick each for clarity.

Minimum competency: Redraw a box form in all six systems with correct edge logic and basic cast-shadow indication.

Practice drills: Six thumbnails per system (proportions + read-order); one refined hero drawing.

Deliverable: Pictorial plate (A3) labelled with the six views.

3) Lineweights & Drawing Hierarchy

Learn: three-tier system (cut/profile/guide) and how to keep read-order stable across a sheet.

Minimum competency: Re-ink one orthographic set so mass reads first, detail second, construction last.

Drills: outline → interior → guides passes; add a small legend on-sheet.

Deliverable: One re-inked A3 with legend.

4) Lettering & Sheet Layout

Learn: single-stroke uppercase; margins, gutters, caption baselines; title-block essentials.

Minimum competency: Assemble one sheet with consistent type/spacing and a complete title block.

Deliverable: Compiled A3 (or A2) merging Lessons 1–3 with captions and scale notes.

5) Scale Mastery & Measuring

Learn: when to use 1:20/1:50/1:100/1:200 (or 3/8, 1/4, 1/8); converting real ↔ drawing size.

Minimum competency: Pick and defend a scale for a room and a small building; convert five sizes accurately.

Deliverable: One conversion table + scaled sketch with a scale note.

6) Materials, Hatching & Conventions

Learn: poche (cuts) vs. surface hatch; five basic material patterns; keynote legends.

Minimum competency: Apply poche correctly to a section and light hatches to surfaces; add 3 keynotes.

Deliverable: Section detail with legend (A3).

7) Iteration: Concept → Schematic

Learn: time-boxed loops; criteria scoring (daylight, circulation, privacy, economy, buildability, delight); keep/kill decisions.

Minimum competency: Two full loops (A/B/C variants → score → keep one → restate concept).

Deliverable: Loop tables + a paragraph on what changed between loops.

B. Graded Studio Projects (hand-in specifications)

Project 1 — Seeing Space (Weeks 1–4)

Uses Lessons: 1, 2, 3, 4, 5.

Brief: Analyze and redraw a real room; capture geometry, light, circulation, and occupation.

Deliverables: (i) 2-pt perspective (A2), (ii) measured room drawings (choose orthographic or axon/pictorial as appropriate) with scales, (iii) daylight/occupation diagram (A3), (iv) 1:50 study model.

Assessment rubric:

CriterionWeightPass Standard
Accuracy (scale, alignment, lineweights)35%Consistent hierarchy; correct scales; clean alignment
Light & Use Analysis25%Drawings show plausible light paths and movement
Craft25%Clean drawing edges; tidy model; consistent lettering
Presentation15%Logical layout; readable captions; concise titles

Project 2 — Pavilion: Space, Structure, Light (Weeks 5–9)

Uses Lessons: 3, 4, 5, 6, 7.

Brief: Design a small outdoor pavilion (≤30 m² footprint) for shade and gathering.

Constraints: Max span 6 m; explicit structural idea; one passive daylight strategy; accessible route shown.

Deliverables: Site-scale drawing(s) with scale; clear orthographic/pictorial set of the proposal; structural & daylight diagrams (A2); 1:100 massing model + 1:50 fragment; 6-slide PDF.

Assessment rubric:

CriterionWeightPass Standard
Spatial Idea & Program Fit30%Clear intent; logical circulation; human-scaled
Structure Concept20%Legible load path; feasible spans/supports
Climate Strategy15%Orientation/shading/ventilation annotated
Craft & Representation20%Clean drawings/models; consistent lineweights
Presentation & Reflection15%5-minute pitch + 200-word self-critique

Project 3 — Site & Section: Micro-Studio (Weeks 10–12)

Uses Lessons: 5, 6, 7.

Brief: Convert a 6 × 10 m urban plot into a one-room studio with daylight and a quiet work nook.

Deliverables: (i) Site analysis (sun/wind/approach), (ii) scaled proposal drawings, (iii) façade/material studies (A3), (iv) final 1:100 model, (v) access/egress compliance overlay.

C. Submission Standards

  • Sheet sizes: A1 (final boards), A2 (process), A3 (plates & diagrams).
  • Scales: Site 1:200–1:500; Building 1:100; Details/Fragments 1:20–1:10.
  • Lineweights (guide): Cut 0.5–0.7; profile 0.35; projection 0.18; annotations 0.15.
  • File naming: ARCH101_Lastname_ProjectX_SheetYY.pdf; include source files in a zip.
  • Pin-up order: Context → Drawings → Models → Diagrams → Reflection.

D. 12-Week Schedule (suggested)

WeekFocusMilestones
1Lessons 1–2: 3-View + 3D pictorialsPlate L1 + L2
2Lesson 3 + 4: lineweights & lettering/layoutClean re-ink + compiled sheet
3Lesson 5 + 6: scale + materials/hatchingScale table + material legend
4Project 1 pin-upP1 submission
5Lesson 7: iteration loopsTwo loops logged
6Project 2 — concept & structureScheme + structural idea
7Project 2 — drawings & daylightScaled set + climate diagram
8Project 2 — models & polish1:100 massing + 1:50 fragment
9Project 2 pin-upP2 submission
10Project 3 — site analysisSite board
11Project 3 — drawings & façadesScaled set + façade/material studies
12Final pin-upP3 submission + reflection

E. Reflection & Crit

5-minute crit: (1) Intent in one sentence → (2) What changed since last review → (3) One success → (4) One risk you’ll improve next.

Post-submission log: Upload a 200-word reflection and one annotated image of a weakness you will address in the next project.

Anchors used above link to your current lessons: #lesson-3view, #lesson-3d-pictorials, #lesson-03-lineweights, #lesson-04-lettering-layout, #lesson-06-scale, #lesson-08-materials-hatching, #lesson-10-iteration.

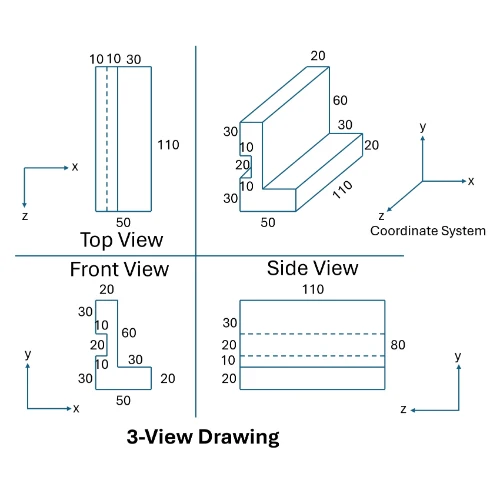
Lesson 1 — Orthographic 3-View (Third-Angle): Read, Align, Dimension

Third-angle 3-view: Top, Front (L-profile), Right Side, and 3D
Overall sizes: X=50, Y=80, Z=110. Top view: a visible vertical edge at x=20 and a hidden vertical edge at x=10. Front view: notch 10×20 (X×Y), located between y=30 and y=50 from the bottom. Right view: a visible horizontal edge at y=20 and hidden horizontal edges at y=30 and y=50 (notch bottom/top).

Learning goals (45–60 min)

  • Read a third-angle plate and use shared projectors.
  • Construct three true views to exact coordinates.
  • Place minimal, non-redundant dimensions in the correct view.

Materials: A3/Letter sheet; 2H (construction) & HB (object) or 0.3/0.5 mm fineliners; 300 mm ruler; eraser.

Drafting set-up — View gaps: 10 mm; Text height: 3 mm; Arrow size: 3 mm; Extension-line offset: 1.5 mm; Dimension-line offset: 8–10 mm; Line weights: object 0.5 mm, interior true edges 0.35 mm, hidden 0.35 mm (dashed 2–3/1–1.5), projectors 0.18–0.25 mm (dotted).

A. Read the plate (what to notice)

  • Axes & directions: X → right, Y → up, Z → towards you (depth).
  • Third-angle layout & quadrants (clockwise):
    • 1st Quadrant (TR) — 3D pictorial (axonometric) for reference.
    • 2nd Quadrant (TL)TOP view (X×Z).
    • 3rd Quadrant (BL)FRONT view (X×Y).
    • 4th Quadrant (BR)RIGHT view (Z×Y).
  • Shared projectors: TOPFRONT share the same width X (drop verticals); FRONTRIGHT share the same height Y (send horizontals).

Edges & visibility (use the coordinates)

  • TOP view (X×Z):
    • Visible edge at x = 20 — a true outer/step face you can see from above.
    • Hidden edge at x = 10 — a vertical face screened from above; show as a dashed line the full depth Z = 110.
  • RIGHT view (Z×Y):
    • Visible edge at y = 20 — an external horizontal face 20 mm above the bottom (show as solid).
    • Hidden edges at y = 30 and y = 50 — these correspond to the lower and upper faces of the notch; show both as dashed lines across the depth Z.
  • FRONT view (X×Y):
    • Left outer edge (x = 0) is visible in two segments: y = 0…30 and y = 50…80.
    • Notch interior vertical edge (x = 10) is visible only from y = 30…50.
    • Notch interior horizontals at y = 30 and y = 50 are visible from x = 0…10.

“Front notch” — treat it as a 3D cut, not a 2D rectangle

The notch removes material of size 10 × 20 (X×Y) in the front-left corner, spanning x = 0…10 and y = 30…50 through the full depth where applicable. Because it is a 3D feature, each view shows a different subset of its edges:

  • FRONT (X×Y): you look straight into the cut, so you see the notch’s interior vertical at x = 10 from y = 30…50, and its interior horizontals at y = 30 and y = 50 from x = 0…10. The outer left edge at x = 0 is interrupted by the void.
  • TOP (X×Z): the step created by the notch does not expose the face at x = 10 to the top view; therefore that edge appears as a hidden line at x = 10. Any face that is flush with the top surface remains visible and is drawn solid (e.g., the step at x = 20).
  • RIGHT (Z×Y): the notch’s bottom and top faces manifest as hidden lines at y = 30 and y = 50 across the depth; the external ledge at y = 20 is visible.

Linetypes: visible = solid; hidden = dashed (2–3 mm dash / 1–1.5 mm gap); projectors = light dotted. Keep line hierarchy: object > interior true edges > hidden > projectors.

B. Build a clean 3-view from scratch (coordinates)

  1. Place origins & gaps. Choose Front origin (0,0) ~60 mm from sheet lower-left. Leave 10 mm above/right for Top/Right.
  2. Front (X×Y).
    • Outer: (0,0) → (50,80) — HB 0.5 mm.
    • Notch to remove: x=0…10, y=30…50 (size 10×20). Result: right leg thickness 40 (x=10…50); bottom cap 30; top cap 30.
  3. Top (X×Z) via vertical projectors.
    • Project up from Front x=0 and x=50; gap 10 mm.
    • Top frame: width 50, depth 110 → lower-left (0,80+10), upper-right (50,80+10+110).
    • Add edges: visible vertical at x=20; hidden vertical at x=10 (dashed).
  4. Right (Z×Y) via horizontal projectors.
    • Project right from Front y=0 and y=80; gap 10 mm.
    • Right frame: depth 110, height 80 → lower-left (50+10,0), upper-right (50+10+110,80).
    • Add edges: visible horizontal at y=20; hidden horizontals at y=30 and y=50 (dashed) for notch bottom/top.
  5. Dimension — exact placement (no duplicates).
    • X=50 on Front (bottom outside). Y=80 on Front (left outside). Z=110 on Top (left outside).
    • Front notch: 10 along Front bottom (x=0→10) and 20 along Front left (y=30→50).
    • Top: chain dims along top edge — 10 (to hidden at x=10), 10 (to visible x=20), 30 (to complete 50).
    • Right: place 20 up from bottom (to visible y=20). Add notes or auxiliary dims as needed to identify hidden edges at y=30 and y=50 (avoid duplicating implied totals).
  6. Line hierarchy & clean-up. Object 0.5 mm; visible interior 0.35 mm; hidden 0.35 mm dashed; projectors 0.18–0.25 mm dotted. Erase construction last.

C. Practice tasks

  • Task 1: Redraw at 1:1 with the same coordinates. Time cap: 25 min.
  • Task 2: Keep X=50, Y=80, Z=110. Move the notch up by 5 mm (y=35…55). Update only affected dimensions and hidden edges on the Right view.
  • Task 3 (challenge): Add an additional hidden edge in Top at x=35 (feature not visible from above). Reflect it in the Right view if appropriate, with minimal dimensions.

D. Hand-in & quick rubric

Submit one sheet: three true views + minimal dimensions. 3D view optional.

CriterionPassWeight
Third-angle alignmentTop shares Front width; Right shares Front height; 10 mm view gaps30%
Line disciplineVisible vs hidden vs projectors shown per spec20%
DimensionsNo duplicates; placements match Step 525%
AccuracyX=50, Y=80, Z=110; Top x=10 (hidden) & x=20 (visible); Right y=20 (visible), y=30 & y=50 (hidden); Front notch 10×20 at y=30…5025%

E. Troubleshooting

  • Top width ≠ Front? Re-drop verticals from x=0 and x=50 and rebuild the Top frame on them.
  • Right height mis-aligned? Re-drop horizontals from y=0 and y=80 before drawing the Right frame.
  • Hidden lines missing? Add x=10 in Top (dashed) and y=30, y=50 in Right (dashed) — they correspond to edges you cannot see directly.
  • Dimension clutter? Keep only: X, Y, Z once; Front 10 & 20 once; Top 10-10-30 chain; Right 20 up from bottom (visible) plus notes for hidden edges.

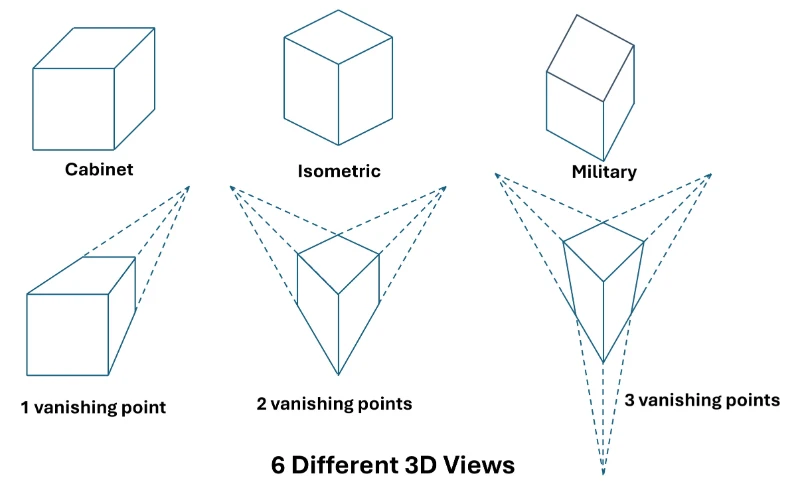
Lesson 2 — 3D Pictorials: Oblique, Axonometric & Perspective (6 Types)

Key Idea: Pick your 3D view by intent. Use Oblique when you need a true, readable face (Cabinet = half depth, Military = true plan/heights). Use Axonometric (Isometric) for uniform foreshortening and easy measuring. Use Perspective for realism—1VP (front true), 2VP (corner views), 3VP (dramatic tall/low) with correctly placed vanishing points. Accuracy = proper angles/scales/VP spacing; clarity = bold outlines, light construction.

Six 3D pictorials of a block: Cabinet, Isometric, Military; and 1-, 2-, 3-vanishing-point perspectives with their vanishing rays.
6 Different 3D Views: Oblique (Cabinet, Military), Axonometric (Isometric), and Linear Perspective (1-, 2-, 3-VP). Dashed rays show vanishing directions.
Top row: Cabinet—front face true; receding depth at ~45° at half scale. Isometric—axes 120° apart; equal foreshortening; no vanishing points. Military—plan and verticals true; oblique depth full scale. Bottom row: 1VP—one VP on horizon; front true; verticals remain vertical. 2VP—two horizon VPs; verticals remain vertical. 3VP—two horizon VPs plus a vertical VP; verticals converge to the third VP.

Learning goals (60–75 min)

  • Recognize the 6 pictorial families and their rules.
  • Construct each type with correct angles, scales, vanishing.
  • Choose the best view for clarity, measurement, or realism.

Materials: A3/Letter paper, HB/2H or 0.1–0.5 fineliners, 30/60° & 45° set squares, long ruler, eraser.

A. Oblique Projections (front face reads true)

A1. Cabinet — front face true; depth at ~45°; depth scale = ½. Good for quick concepts without bulky look.

  • Steps: Draw front face true → project 45° depth rays → mark Z/2 → connect back edges.
  • Note: “Cavalier” uses full depth and appears exaggerated; Cabinet halves depth to compensate.

A2. Military — plan (top) and verticals true; oblique depth full scale. Good when plan dimensions must read exactly.

  • Steps: Draw plan true → erect verticals to true heights → join with oblique depth edges.

B. Axonometric (no vanishing points)

B1. Isometric — axes 120° apart (30°/30° from horizontal + vertical). Equal foreshortening on X, Y, Z.

  • Steps: From a corner set two 30° axes + a vertical → step off X, Y, Z along axes → draw isoparallels to close.
  • Tip: Circles become ellipses; edges not parallel to axes can’t be measured directly.

C. Linear Perspective (with vanishing points)

Horizon line (HL) = eye level. Place vanishing points wide enough to avoid distortion.

C1. 1-Point — one VP on HL; front face true; verticals vertical.

  • Steps: Draw picture plane/front face → place VP on HL → send receding edges to VP → cap depths.

C2. 2-Point — two VPs on HL; verticals vertical; used for corner views.

  • Steps: Mark HL → place VP₁ & VP₂ (≈1.5–2× object width apart) → draw vertical corner → send sides to each VP → measure heights.

C3. 3-Point — two horizon VPs + a vertical VP; verticals converge; dramatic tall/low angles.

  • Steps: Start as 2VP → add VP₃ above/below HL → tilt all verticals toward VP₃ consistently.

D. Quick comparison (choose wisely)

TypeTrue-size featuresDistortion riskBest for
CabinetFront face true; depth = ½Low–moderateFast concept, readable face
MilitaryPlan & heights true; depth fullModeratePlan-driven objects/terrain
IsometricNone true; equal foreshorteningLowTech/Product views
1-VPFront trueLowFaçades, corridors
2-VPNone trueMedium (tight VPs)Corner views
3-VPNone trueHigh if VPs closeDramatic tall/low shots

E. Practice (choose any two)

  • Cabinet vs Isometric: Draw the same 50×80×110 block; annotate depth handling (½Z vs equal foreshortening).
  • 1-VP corridor: Lay out 5 equal floor tiles; VP on HL; show foreshortening precisely.
  • 2-VP corner box: Keep VPs 1.5–2× object width from center; add a vertical cut-out.
  • 3-VP tower: HL mid-page; VP₃ above HL; ensure all verticals converge consistently.

F. Hand-in & quick rubric

Submit one sheet showing any three types with labels and short notes on their rules.

CriterionPass descriptionWeight
Setup accuracyCorrect axes/angles, scales, or VP placement40%
Depth/foreshorteningCabinet ½ depth; Military full; Isometric equal; Perspective recedes to correct VPs40%
Line quality & clarityOutlines bolder; construction light; labels clear20%

Lesson 3 — Lineweights & Drawing Hierarchy

Goal (30–45 min): Establish a reliable 3-tier system so mass reads first, detail second, guides last.

  • Tier 1 (Bold): cut lines, object profile, silhouette.
  • Tier 2 (Medium): interior visible edges, joints, furniture outlines.
  • Tier 3 (Light): centerlines, grids, hidden/dashed, construction guides.

Steps

  1. Pick 3 repeatable tools (e.g., 0.5 / 0.3 / 0.1 or HB / H / 2H).
  2. Place a legend on every sheet linking weight ↔ role.
  3. Re-ink your L-block: Tier-1 = outline; Tier-2 = interiors; Tier-3 = guides.
  4. Squint test: the mass should pop from 1.5 m away.
Tier-1 (cut/profile) Tier-2 (visible interior) Tier-3 (guides/hidden) Profile = Tier-1 Interior = Tier-2 Guides = Tier-3
Legend + sample. Keep the legend on every sheet to train consistency.
CriterionPassWeight
ConsistencySame tool = same tier across sheet40%
Read orderMass first, detail second, guides last40%
CleanlinessNo double-lines; neat endpoints20%

Lesson 4 — Architectural Lettering & Sheet Layout

Outcome: Produce a sheet that can be understood in five seconds: title → main views → captions → notes. The trick is a small, consistent lettering system and a simple layout grid.

A. Lettering system (use these three sizes)

  • Titles / section headers: 6–8 mm, single-stroke uppercase (no serifs).
  • Captions / labels: 3.5–4 mm uppercase; keep tracking even; avoid mixed cases.
  • Dimensions / notes: 3.0–3.2 mm; lighter lineweight than outlines.

Tip: write three guide lines in pencil (top, x-height, baseline). Erase guides after inking.

B. Page frame & grid

  • Margins: 10–12 mm on all sides (keeps nothing crowding the edge).
  • Gutters: equal spacing between views; align left/right edges or centers.
  • Caption baseline: draw one faint horizontal line and align all captions to it.
  • Title block (bottom-right): project, your name, date, scale(s), sheet number.

C. 6 clear steps (follow in order)

  1. Frame the page: draw margins; pencil a light grid for 2–3 view rectangles.
  2. Place the drawings: drop in Lesson-1/2 views or print/trace them to fit the rectangles.
  3. Align captions: set one caption baseline; write short labels beneath each view (e.g., TOP — 1:1, SIDE — 1:1).
  4. Add the title block: bottom-right box; keep consistent fields and order each time.
  5. Check hierarchy: title reads first, views second, captions third; nothing touches margins.
  6. Clean up: erase construction lines; ensure all text sits horizontal and evenly spaced.

D. Do / Don’t (quick guardrails)

  • Do keep words short: “Front View — 1:1”. Don’t write sentences under drawings.
  • Do keep one caption line for all views. Don’t stagger captions at different heights.
  • Do leave white space. Don’t let anything sit closer than the gutter you set.
Title | Name | Date | Scale | Sheet Captions align on one baseline 10–12 mm margins
Plan the sheet before content. Use one caption baseline and anchor a consistent title block at the bottom-right.

E. Practice task (30–45 min)

  • Assemble your Lesson-1 “3-View Orthographic” and Lesson-2 “3D Pictorials” on one A3/Letter sheet.
  • Add concise captions and a title block. Include scale under each view (e.g., 1:1 or NTS).
  • Export/scan to PDF at 300 dpi. Check that titles, captions and notes remain readable when printed.

Assessment rubric

CriterionPass standardWeight
LegibilityUniform single-stroke lettering; clear title/caption hierarchy35%
OrganizationMargins and gutters consistent; views and captions neatly aligned40%
Professional finishGood white space; no crowding; clean erasures/print25%

Lesson 5 — Scale Mastery & Measuring

Goal (35–50 min): Convert accurately and pick the smallest readable scale that fits the story and the sheet.

  • Metric: 1:20 (details), 1:50 (rooms), 1:100 (small buildings), 1:200/1:500 (site).
  • Imperial: 3/8”, 1/4”, 1/8” = 1’-0”.

Worked conversions

Real (mm)1:50 (mm)1:200 (mm)
42008421
900184.5
1200024060

Steps

  1. Choose scale to fit views + captions + north/scale bars.
  2. Compute Drawing = Real ÷ Scale; round at the end only.
  3. Label every view with its scale; use “NTS” for concept diagrams.


Pick scale => fits sheet + captions + north/scale bar
Room plan → 1:50 (details legible)
Whole building → 1:100; Site → 1:200
State why a scale is chosen (readability + sheet fit). Add a scale note under each view.
CriterionPassWeight
AccuracyConversions correct; units explicit50%
SuitabilityScale matches story + sheet30%
NotationEvery view labeled with scale20%

Lesson 6 — Materials, Hatching & Conventions

Goal (30–45 min): Communicate materials and cut vs. surface with a small, consistent set of hatches and tags.

  • Cut poche: solid fill or dense hatch (bold Tier-1 + filled) used only at the cut line in section.
  • Surface hatch: light, even pattern for visible faces (Tier-3 weight) — not as dark as poche.
  • Tags/notes: keep to short keynotes (e.g., CONC, BRK, TIM, INS, GLS) linked to a legend.
CONC
BRK
TIM
INS
GLS

Keep hatch angles/spacing consistent across the sheet. Use bold poche only at the cut; use lighter surface hatches on visible faces.

Steps

  1. Create a mini legend with these five patterns (CONC, BRK, TIM, INS, GLS). Keep lineweight light for surfaces, bold for poche.
  2. Decide when to use poche (only at cuts) vs. surface hatch (for seen faces).
  3. Attach concise notes: material, thickness (if relevant), finish (e.g., “12 mm gypsum board, paint”).

Practice

  • In one short paragraph, explain how your brick veneer wall is annotated in plan vs. section (what changes between them).
  • Create three keynotes and a legend entry for each (e.g., BRK-01, TIM-02, GLS-03).
CriterionPassWeight
ConsistencyUniform hatch density/angle and lineweight across the sheet40%
CorrectnessCut vs. surface clearly separated; poche used only at the cut40%
NotationClear legends, concise tags/notes that match the drawing20%

Lesson 7 — Iteration: From Concept to Schematic (with examples)

Key idea: Don’t fall in love with the first idea. Use a short, repeatable loop to test three variants at a time against clear criteria, keep the best, and learn what to try next.

Goal (60–75 min): Run two full iteration loops (Concept → 3 Variants → Score → Decision → Refine) and document them so another person can follow your reasoning.

  • Work fast (markers/trace), not precious. Time boxes create clarity.
  • Judge with criteria, not taste: daylight, circulation, privacy, economy, buildability, delight.
  • Record decisions. Iteration is only “real” if it is visible and repeatable.

The 5-step loop (time boxed)

  1. State intent (2 min): one sentence that frames the design move you’re testing. Example: “A small studio organized around a bright outdoor courtyard.”
  2. Produce three variants (12–15 min total): A/B/C at thumbnail scale (plans or sections). One drawing per variant, big pen, no rulers.
  3. Score (5 min): Rate each variant 0–3 for each criterion; add a brief note per row.
  4. Decide (3 min): Keep 1, archive 2. Write a one–two line rationale.
  5. Restate intent (2 min): Update the sentence with what you’ve learned and repeat one more loop.

Criteria glossary (how to measure quickly)

CriterionWhat you’re checkingQuick test
DaylightDepth of rooms vs. window placement; south/east/west exposure control.Shade the “deep shade” zones (>2× window head height from glass).
CirculationDirectness, clarity, no wasted corridors.Trace primary path with one continuous line; count turns & dead ends.
PrivacySeparation between quiet vs. noisy; views in/out.Mark “quiet bubbles”; check overlaps with kitchen/entry.
EconomyArea efficiency; exterior perimeter length.Compare “Area ÷ Perimeter” (higher is usually better).
BuildabilitySimple spans, regular structural grid, reasonable roof/wall logic.Sketch spans and supports; flag spans over ~6 m as risk.
DelightMoments of spatial quality: arrival, outlook, scale shift.Circle one “wow” moment. If none, score low.

Worked example (Loop 1)

Context: 10 m × 16 m urban lot; north at top; street on west; 1-story micro-studio.

Intent-1: “Bring even daylight to a deep plan via a central courtyard.”
  • Variant A — Central court: Courtyard in the middle; rooms all around; entry from west.
  • Variant B — Side court: Courtyard along south edge; rooms to the north; continuous north wall.
  • Variant C — Split court: Two small light wells (north & south) with a thick center band for service.
Criteria (0–3)ABCNotes (most critical observations)
Daylight322A lights all sides; B risks glare from south; C is even but dimmer
Circulation132A has ring corridor; B is direct spine; C has a kink
Privacy223C separates sleep & work best
Economy132A has long perimeter; B most compact; C moderate
Buildability232B supports simple roof span
Delight322A has clear center; B frames south garden; C has small moments
Total121513
Decision: Keep B (best balance of efficiency and clarity). Archive A (beautiful but wasteful) and C (quiet but fussy).Next intent (for Loop 2): “Refine the side-court scheme so the studio still gets morning light without glare.”

Loop 2 (refinement pass)

  • B1 — Raised clerestory along the north wall to bounce light deeper.
  • B2 — Sawtooth roof over the studio, glazing to the south with shading.
  • B3 — Deeper south court with a pergola (controls summer sun; admits winter sun).
Criteria (0–3)B1B2B3Notes
Daylight233Sawtooth and pergola both improve quality
Circulation333Same core spine
Privacy223Pergola increases screening
Economy323Sawtooth costs more
Buildability323Standard truss vs. custom roof
Delight233Sawtooth & pergola both create moments
Total151518
Decision: Keep B3. It matches the original economy/clarity while delivering better light and privacy outdoors.

Iteration log (fill this in)

DateIntent sentenceVariantsKeptWhy (1–2 lines)
__/__/__A / B / C
__/__/__A’ / B’ / C’

Print this table and sketch the thumbnails directly beside each row.

Scoring matrix (blank)

CriteriaVar-1Var-2Var-3Notes
Daylight
Circulation
Privacy
Economy
Buildability
Delight
Total

Practice & deliverables

  • Run two full loops as shown above (six thumbnails total).
  • Submit: iteration log, two scoring tables, and a 150-word reflection titled “What changed between Loop-1 and Loop-2?”
  • Pin-up: arrange left→right = Loop-1 (A/B/C), scores, decision; Loop-2 (A’/B’/C’), scores, decision; final intent sentence.

Assessment rubric

CriterionPass standardWeight
RigorTwo complete loops; three variants per loop; scores filled with brief notes35%
ReasoningDecision justified by criteria (not preference); contradictions addressed30%
ClarityReadable thumbnails; legible scores; concept sentences are precise20%
Reflection150-word summary explains what improved and what to try next15%

Common pitfalls (and fixes)

  • Variants are too similar. Force one “wild card” per loop (break a rule on purpose).
  • Scoring by vibe. Use quick tests (path length, perimeter length, shaded depth) to anchor the numbers.
  • No record of change. Photograph each loop; label drawings “Loop-1 A/B/C”, “Loop-2 A’/B’/C’”.

Architecture: Designing Space, Shaping Lives

Architecture is far more than the construction of buildings—it is the creative and technical process of designing spaces that shape how we live, work, move, and interact. From ancient temples to modern smart cities, architecture reflects human values, aspirations, and technological capabilities. At its core, the discipline balances functionality, aesthetics, and sustainability to improve quality of life while addressing evolving societal needs.

Functionality in architecture involves not just the usability of a building, but also its adaptability, circulation, accessibility, and safety. Whether it is a school that promotes learning, a hospital designed for healing, or a public plaza encouraging community engagement, every element must serve a practical purpose. Architects must also consider building codes, zoning regulations, and universal design principles to ensure inclusivity.

Aesthetics plays a central role in how spaces feel and are perceived. Visual composition—through form, materiality, color, proportion, and light—creates emotional resonance and cultural meaning. For example, the serene symmetry of classical Greek temples conveys harmony, while the expressive lines of modern architecture signal innovation and freedom. Great architectural design not only functions well but inspires and uplifts those who inhabit it.

Sustainability has emerged as a key priority in the face of climate change and urban expansion. Architects today explore green roofs, passive solar design, carbon-neutral materials, and renewable and energy-efficient systems to reduce environmental impact. In line with the Architecture 2030 Challenge, the profession is committed to achieving net-zero emissions in new construction within the next decade.

Equally important is the cultural and historical sensitivity embedded in architectural practice. Buildings do not exist in a vacuum—they respond to their environmental context and the heritage of their place. Informed design honors tradition while enabling progress, as seen in projects that incorporate local materials, vernacular forms, or indigenous knowledge systems. The International Council on Monuments and Sites (ICOMOS) promotes such conservation-minded approaches globally.

Architecture also intersects with emerging technologies. Digital design tools like Building Information Modeling (BIM), generative design, and 3D printing are revolutionizing how architects prototype and construct. Smart buildings now incorporate sensors, adaptive systems, and responsive façades to enhance user comfort and efficiency. For insight into these trends, consult the ArchDaily platform, which curates global architectural innovation.

Beyond professional practice, architecture influences education, environmental policy, and civic identity. Urban design decisions shape pedestrian safety, mental well-being, and social cohesion. Educational programs in architecture nurture not only design skills but also systems thinking, ethical reasoning, and interdisciplinary collaboration. Resources like the American Institute of Architects (AIA) offer guidance on licensure, continuing education, and community involvement.

Ultimately, architecture shapes our lived experience—from the homes we inhabit to the skylines that define our cities. As we face global challenges such as rapid urbanization, housing inequality, and environmental degradation, the role of architecture in crafting resilient, inclusive, and beautiful spaces has never been more crucial. For those seeking real-world applications of these ideals, the World Architecture Community showcases projects that blend vision with impact across diverse geographies.

Architecture: Exploring the Dimensions

Urban Planning

  • Definition:
    The strategic design and organization of public spaces, infrastructure, and cityscapes to create livable, functional, and sustainable urban areas.
  • Key Aspects:
    • Zoning and Land Use: Allocating spaces for residential, commercial, and industrial purposes.
    • Public Spaces: Designing parks, squares, and recreational areas to enhance community interaction.
    • Transportation Systems: Integrating efficient public transit and pedestrian-friendly layouts.
  • Applications:
  • Examples:
    • The master planning of Singapore as a green, urban metropolis.
A stunning illustration of Singapore as a green, urban metropolis, featuring lush vertical gardens, rooftop parks, and smart infrastructure, symbolizing sustainable city planning and environmental innovation.
A vibrant illustration of New York City’s High Line, showcasing its transformation from an elevated railway into a lush public park, blending urban renewal, sustainability, and community engagement.

Sustainable Architecture

  • Definition:
    Designing buildings and structures that minimize environmental impact through eco-friendly materials, energy efficiency, and sustainable practices.
  • Key Aspects:
    • Green Materials: Using recycled, renewable, and locally sourced materials.
    • Energy Efficiency: Incorporating solar panels, passive cooling systems, and energy-efficient lighting.
    • Water Management: Designing rainwater harvesting systems and reducing water waste.
  • Applications:
    • Creating net-zero energy buildings that generate as much energy as they consume.
    • Designing structures that adapt to changing environmental conditions.
  • Examples:
A striking illustration of The Edge in Amsterdam, showcasing its futuristic glass facade with solar panels, smart infrastructure, and eco-friendly urban planning, symbolizing innovation in sustainable architecture.
    • Earthship homes constructed from recycled materials and designed for off-grid living.
A captivating illustration of an Earthship home, showcasing its sustainable design with recycled materials, solar panels, a greenhouse, and a rainwater collection system, embodying self-sufficient, off-grid living.

Interior Design

  • Definition:
    The art and science of enhancing the interiors of buildings to create functional, aesthetically pleasing, and harmonious spaces.
  • Key Aspects:
    • Space Optimization: Maximizing the use of available space without compromising comfort.
    • Material Selection: Choosing finishes, furniture, and decor that align with the overall design vision.
    • Lighting and Acoustics: Designing for proper illumination and sound management to enhance user experience.
  • Applications:
    • Designing residential interiors that reflect the personalities and needs of occupants.
    • Creating commercial spaces that align with brand identity and functionality.
  • Examples:
    • Open-plan office layouts that promote collaboration and productivity.
Illustration of an open-plan office layout, showcasing collaborative workspaces, shared desks, and brainstorming areas, fostering productivity and teamwork in a modern workplace.
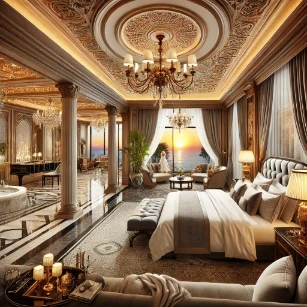
    • Luxurious hotel interiors designed to provide comfort and opulence.
A luxurious hotel interior featuring grand chandeliers, plush seating, and a lavish suite with elegant furnishings, highlighting comfort, opulence, and world-class hospitality.

Real-World Impact of Architectural Design

Urban Development and Infrastructure Projects

  • Overview:
    Architecture contributes to the growth and modernization of urban areas by designing infrastructure that supports community needs and economic development.
  • Applications:
    • Planning transportation hubs, including airports, train stations, and bus terminals.
    • Designing mixed-use developments that combine residential, commercial, and recreational spaces.
  • Examples:
    • Dubai’s Burj Khalifa district, which integrates high-rise living, retail, and leisure facilities.
A stunning illustration of Dubai’s Burj Khalifa district, highlighting its luxurious high-rise living, upscale retail spaces, and vibrant leisure facilities set against a dazzling cityscape.
    • The redevelopment of London’s King’s Cross area into a vibrant urban hub.
Illustration of London’s King’s Cross redevelopment, showcasing its transformation into a dynamic urban hub with a mix of historic and modern architecture, green spaces, and lively public areas.

Restoration and Conservation of Historical Sites

  • Overview:
    Architectural expertise is essential for preserving and restoring historical structures, ensuring their longevity and cultural significance.
  • Applications:
  • Examples:
    • The restoration of the Taj Mahal to preserve its intricate marble inlays.
A stunning illustration of artisans meticulously restoring the Taj Mahal’s intricate marble inlays, preserving its historic beauty and architectural brilliance.
    • The adaptive reuse of old factories into cultural centers, such as Tate Modern in London.
A vibrant illustration of an old factory repurposed into a cultural center, inspired by Tate Modern in London, showcasing contemporary art exhibitions, interactive installations, and a lively public plaza.

Architecture on the Edge: Innovations Redefining the Field

Smart Buildings and Technology Integration

  • Overview:
    Incorporating advanced technologies, such as IoT (Internet of Things), to create intelligent and responsive buildings.
  • Examples:
    • Smart thermostats and lighting systems that adapt to occupant behavior.
A futuristic illustration of a smart home featuring adaptive thermostats and lighting systems that automatically adjust based on occupant behavior, enhancing comfort, energy efficiency, and convenience.
A futuristic illustration of an intelligent building management system, showcasing real-time energy monitoring, climate control, and resource optimization for a sustainable and efficient urban environment.

Biophilic Design

  • Overview:
    Designing spaces that integrate natural elements to enhance well-being and connection to nature.
  • Examples:
A breathtaking illustration of an urban environment transformed with vertical gardens and green walls, integrating lush greenery into modern architecture to enhance sustainability and biodiversity.
  • Incorporating natural light and ventilation into building designs.
A stunning illustration of a modern building integrating natural light and ventilation, featuring expansive glass windows, skylights, and airflow-enhancing designs for a sustainable and comfortable environment.

Modular and Prefabricated Construction

  • Overview:
    Using prefabricated components to streamline construction processes and reduce costs.
  • Examples:
    • Modular homes that can be assembled quickly and efficiently.
A captivating illustration of modular homes being efficiently assembled, showcasing rapid construction with prefabricated units, sustainable designs, and eco-friendly features in a modern residential community.
Prefabricated Schools and Hospitals – A powerful illustration of modular classrooms and medical facilities being rapidly deployed in a disaster-stricken area, highlighting resilience, humanitarian aid, and the swift restoration of essential services.

Sustainable Urbanism

Designing Eco-Villages – A vibrant illustration of a sustainable community featuring energy-efficient homes, communal gardens, and renewable energy sources, emphasizing self-sufficiency and environmental stewardship.

Designing Eco-Villages – A vibrant illustration of a sustainable community featuring energy-efficient homes, communal gardens, and renewable energy sources, emphasizing self-sufficiency and environmental stewardship.

  • Planning car-free urban zones to reduce pollution and promote public transit.
Planning Car-Free Urban Zones – A vibrant illustration of a pedestrian-friendly city with green spaces, dedicated bike lanes, and modern public transit, promoting sustainability and reducing pollution.

Architecture in a Changing World: Noble Challenges

Balancing Aesthetics and Functionality

Architecture is more than a visual statement—it is a lived experience. Striking a balance between form and function challenges architects to think beyond appearance. A building must inspire with its elegance while facilitating the day-to-day rituals of human life. An evocative facade should not hinder natural lighting or ventilation. A sculptural layout should not compromise emergency egress or usability. This delicate harmony demands a mastery of both the artistic eye and the engineering mind. As expectations for inclusive and adaptive environments grow, success lies in uniting creative expression with structural pragmatism—where beauty is not ornamental, but essential to how a space is used, navigated, and remembered.

Sustainability vs. Cost

Green architecture is no longer optional—it is imperative. Yet every eco-conscious decision carries budgetary weight. Architects must weigh the short-term financial realities against the long-term planetary imperative. Low-carbon materials, renewable energy integration, and passive systems come with upfront costs, but offer downstream savings in energy, health, and resilience. Through rigorous life-cycle analysis, architects become stewards of not only design, but environmental ethics. Bridging the gap between aspiration and affordability, between idealism and real-world constraints, is the defining struggle—and responsibility—of contemporary green building practice.

Cultural Sensitivity

The language of architecture must speak to history as well as to the future. Each project becomes a narrative etched in steel, glass, and stone. Especially in multicultural or postcolonial contexts, buildings can affirm or erase collective memory. Architects must avoid imposing imported aesthetics that flatten unique cultural histories. Instead, they must listen deeply—to local materials, craft traditions, spatial customs, and community values. Drawing from cultural studies fosters a sense of place and belonging, allowing architecture to become an act of preservation, healing, and empowerment rather than erasure or spectacle.

Adapting to Climate Change

The climate crisis is now a design constraint. Rising sea levels, heatwaves, flooding, and seismic volatility are rewriting the rules of construction. Architects must design not just for elegance and efficiency, but for survival. Materials must endure extremes. Foundations must adapt to shifting soils. Public buildings must become shelters in times of crisis. In this era of uncertainty, architectural resilience hinges on integrating environmental science with foresight. Collaborating with hydrologists, structural engineers, and fluid mechanics experts can lead to innovations like floodable basements, heat-reflective facades, and self-healing concrete. The buildings we create today must not merely endure but adapt to a planet in flux.

Designing the Future: Where Architecture Is Headed

Circular Architecture

The future of architecture will be circular or it will be obsolete. This paradigm envisions buildings not as static objects, but as dynamic material banks—structures designed with their own eventual disassembly and reuse in mind. Architects are turning to modular construction, reversible joints, biodegradable insulation, and salvaged components. Circular thinking also encourages new spatial metaphors: spaces that evolve with their users, not expire with them. By designing for disassembly and regeneration, architects help shape an economy that mimics ecosystems—where nothing is wasted, and everything transforms. This vision aligns closely with global efforts toward sustainability and renewable stewardship.

Focus on Resilient Design

Resilience is the new luxury. In the face of ecological, economic, and geopolitical upheaval, architecture must do more than shelter—it must empower. This means designing buildings that bounce back from disruption: modular hospitals, floating schools, climate-adapted homes. It means hybridizing indoor and outdoor space, creating redundancies in water and energy systems, and ensuring that architecture can flex with shifting demographics or usage patterns. Architects are partnering with civil engineers and data scientists to simulate disasters and stress-test designs. The goal is no longer just permanence, but responsiveness—spaces that are rugged yet humane, rooted yet mobile, durable yet open to reinvention.

Global Collaboration

Architecture is increasingly a borderless discipline. Through open-source platforms, virtual modeling, and global competitions, architects from Nairobi to New York are co-creating solutions to shared challenges. Knowledge flows freely—on seismic retrofitting in Nepal, flood-resistant housing in Bangladesh, or refugee shelters in Jordan. By fostering collaboration between institutions, firms, and governments, architecture becomes a vehicle for diplomacy and equity. These cross-cultural synergies are also essential for international business strategies in real estate, infrastructure, and cultural preservation. In this global design ecosystem, innovation thrives not in isolation, but through dialogue that honors both local nuance and planetary needs.

Human-Centered Design

The most visionary architecture begins with the question: who will live here, and how? The shift toward human-centered design places lived experience at the core of architectural intent. This encompasses not just accessibility, but sensory comfort, psychological well-being, and community interaction. It asks: how does this building feel to touch, to hear, to inhabit at night? Incorporating biophilic elements like green walls or daylight corridors fosters mental health. Designing with neurodiversity or aging populations in mind ensures dignity and participation. Human-centered architecture is not about spectacle, but service—a quiet radicalism that reshapes the world one thoughtfully designed threshold at a time.


Building Ideas Into Reality: Why Architecture Matters

Shaping the Built Environment

Architecture is the art and science of designing buildings and spaces that shape how we live, work, and interact. By studying architecture, students learn how structures influence human behavior, culture, and well-being. From houses and schools to public parks and urban skylines, architects leave a lasting mark on the physical world. Studying architecture enables learners to balance functionality with aesthetics while responding to environmental, historical, and social contexts.

Bridging Art, Science, and Technology

Architecture is inherently interdisciplinary. It brings together creative design thinking with technical knowledge in areas such as physics, material science, structural engineering, and environmental sustainability. Students develop proficiency in drawing, modeling, and digital design tools while also learning to calculate load distributions, thermal performance, and spatial flow. This blend of disciplines makes architecture a uniquely challenging and rewarding field that demands both vision and precision.

Solving Real-World Problems

Architects don’t just draw buildings—they solve problems. They design spaces that respond to climate challenges, urban density, energy efficiency, and cultural needs. Studying architecture trains students to approach each project with a problem-solving mindset: How can this building be more inclusive? How can it reduce carbon emissions? How will it serve its users for generations to come? These practical, human-centered concerns are at the heart of architectural education and practice.

Developing Transferable Skills

Architecture students cultivate a broad set of skills that are highly valuable across disciplines. These include creative ideation, spatial reasoning, technical drawing, project planning, and visual communication. Through studio work and critique, students also develop resilience, teamwork, and the ability to defend ideas constructively. Such skills are transferable to careers in urban planning, industrial design, sustainability consulting, construction management, and digital fabrication.

Building a Career with Purpose

A degree in architecture opens pathways to a wide range of careers that shape how people experience their environments. Whether becoming a licensed architect, working in interior or landscape design, contributing to heritage conservation, or innovating in smart city development, architecture graduates can find meaning in creating spaces that improve lives. It is a field where creativity meets responsibility—and where vision becomes reality.


Where Vision Meets Reality: Concluding Thoughts

Architecture stands at the crossroads of creativity and practicality—shaping not only buildings but also the rhythms of daily life, the identities of communities, and the possibilities of sustainable futures. It is a discipline rooted in tradition yet constantly evolving through innovation, materials science, cultural awareness, and digital technology. Whether through urban and regional planning, heritage conservation, or adaptive reuse, architecture connects the past to the future with purpose and care.

At its best, architecture balances form and function while addressing pressing global needs such as environmental stewardship, social equity, and livable cities. As architects respond to the demands of climate change, population growth, and technological advancement, they remain vital contributors to sustainable development and quality of life enhancement. For students and professionals alike, architecture is more than a career—it is a calling to reimagine space, reshape environments, and reaffirm our shared humanity through design.

From Concept to Construction – What Do You Know?

1. What is architecture?

Answer: Architecture is both an art and a science. It shapes buildings and spaces to meet our needs—like shelter and safety—while also expressing culture, identity, and beauty. It combines creative ideas with technical skills, covering not just buildings but also parks, plazas, and cityscapes that influence how we live and interact every day.

2. How does sustainable design influence modern architecture?

Answer: Sustainable design helps create buildings that are kind to both people and the planet. It reduces energy use, cuts pollution, and supports health by using natural light, fresh air, and eco-friendly materials. Green roofs, solar panels, and smart planning make buildings more efficient and long-lasting—while helping tackle climate change.

3. What role does urban planning play in architectural design?

Answer: Urban planning sets the stage for architecture. It looks at how buildings fit into the bigger picture—like roads, parks, and public services. Architects work within these plans to ensure their designs support walkable cities, efficient transport, and vibrant communities. It’s a team effort to create livable, sustainable places for all.

4. How do aesthetics and functionality balance in architectural design?

Answer: A great building doesn’t just work—it inspires. Functionality makes sure it’s safe, useful, and efficient. Aesthetics make it meaningful and beautiful. Architects balance both by shaping spaces that are easy to use and pleasing to the eye. When done well, the building feels just right, inside and out.

5. What is the significance of building materials in determining a structure’s performance?

Answer: The choice of materials affects how a building stands, breathes, and lasts. Some keep heat in or noise out. Others resist fire or weather. Using strong, sustainable materials—like recycled steel or natural wood—can make buildings safer, greener, and more cost-effective in the long run.

6. How have technological advances impacted modern architecture?

Answer: Technology has transformed how architects imagine and build. Digital tools like 3D modeling and virtual reality help visualize and test ideas quickly. New methods like 3D printing and prefabrication make building faster and more flexible. Smart systems let buildings adjust lighting, temperature, and energy use in real time—boosting comfort and efficiency.

7. What is the importance of historical context in architectural design?

Answer: History gives depth to design. By learning from local traditions and older buildings, architects can create spaces that respect and reflect a place’s story. This might mean restoring a historic site, blending old styles with new ideas, or protecting views that matter. It helps new buildings feel like they truly belong.

8. How do architects address the challenges of climate change in their designs?

Answer: Architects help fight climate change by designing buildings that use less energy and handle extreme weather. They place windows to catch breezes and light, add shade and insulation to stay cool or warm, and choose sites that avoid flood risks. They also use green materials and add rain gardens or solar panels to boost resilience.

9. What are some key trends in contemporary architecture?

Answer: Today’s architecture focuses on sustainability, simplicity, and smart living. Green roofs, recycled materials, and open spaces are popular. Many designs reuse old buildings to save resources. Smart technologies—like sensors and apps—let buildings respond to people’s needs, making them more personal, efficient, and future-ready.

10. How does collaboration between architects and other professionals enhance project outcomes?

Answer: Architecture is a team sport. Architects team up with engineers, builders, planners, and others to make sure every part of a project works well. Together, they solve problems, improve safety, and save money. By sharing ideas early, they create buildings that are not just strong and efficient, but also thoughtful and inspiring.


Rethinking Space and Structure

1. How might advancements in sustainable materials transform architectural design in the next decade?

Answer: New materials like self-healing concrete, algae-based insulation, and mycelium composites are changing how buildings are designed. These materials are more eco-friendly, often stronger, and sometimes even biodegradable. They help reduce waste and carbon emissions, while opening up new creative forms and longer-lasting structures. This shift supports a more circular economy where buildings can one day be reused or safely return to the earth.

2. In what ways can digital fabrication and 3D printing reshape the construction process?

Answer: With digital tools and 3D printing, buildings can be made faster, with less waste and more precision. Complex shapes can now be printed directly using sustainable materials, reducing the need for many separate parts. This method also cuts down on labor and speeds up construction. As a result, architects can dream up forms that once seemed impossible—now practical and efficient to build.

3. How does the integration of smart technology in buildings change the role of architects?

Answer: As buildings become smarter, architects must design not just for space, but for how buildings respond to people and their needs. This includes systems for lighting, temperature, security, and more—all connected and adaptive. Architects now work closely with tech experts to create spaces that adjust in real time, blending the digital and physical into seamless environments.

4. What impact does cultural context have on the design and function of public spaces in urban environments?

Answer: Culture shapes how public spaces look and feel—and how people use them. When designers respect local traditions, languages, and rituals, public spaces become places of connection and pride. Markets, parks, and plazas that reflect local identity are more welcoming and active. Ignoring culture, however, can lead to spaces that feel disconnected or unused.

5. How can architecture contribute to social sustainability and community well-being?

Answer: Architecture builds more than structures—it builds relationships. Spaces like community centers or shared housing support connection and inclusion. Design that welcomes people of all ages and backgrounds helps foster fairness, safety, and trust. When communities help shape their own environments, those places become more vibrant, cared for, and lasting.

6. What challenges do architects face when designing buildings for rapidly growing urban centers?

Answer: In fast-growing cities, architects must do more with less—less space, fewer resources, and tighter timelines. They face traffic, pollution, overcrowding, and rising costs. Smart design includes mixed-use buildings, compact layouts, green spaces, and flexible interiors. Solutions must also be affordable and sensitive to local needs, especially in informal settlements.

7. How might advances in renewable energy integration influence the future of architectural design?

Answer: As solar panels, wind turbines, and geothermal systems become easier to use, buildings can produce their own clean energy. This changes how buildings are shaped and positioned—to catch the sun or the breeze. Some future buildings may generate more power than they need, helping cities shift to clean energy and lower emissions.

8. In what ways can adaptive reuse of historic buildings contribute to urban regeneration?

Answer: Turning old factories or churches into galleries, homes, or offices gives new life to forgotten spaces. It saves materials, honors history, and brings charm and character to neighborhoods. These projects often inspire more investment and activity, making cities more vibrant without tearing down their past.

9. How do you envision the future of architecture in response to global challenges such as climate change and resource scarcity?

Answer: Architecture will focus on survival and renewal. Buildings will need to use less energy, stand up to extreme weather, and work in harmony with nature. Materials may clean the air or grow like plants. Spaces might help store water, grow food, or shelter wildlife. Design will aim not just to do less harm, but to help heal the planet.

10. What role does public art play in enhancing the urban landscape, and how can architects integrate it effectively?

Answer: Public art adds soul to a city. It tells stories, sparks conversations, and helps people feel at home. Architects can work with artists to blend art into benches, walls, or plazas—making it part of daily life. When art is part of the design from the start, it feels natural, meaningful, and alive.

11. How can the principles of biophilic design influence architectural practices and improve human health?

Answer: Biophilic design brings nature indoors—through plants, daylight, fresh air, and natural textures. These elements reduce stress, boost focus, and lift mood. In hospitals, offices, and schools, such design supports faster healing, better learning, and a sense of calm. It reminds us that we’re part of nature, not separate from it.

12. What are the potential economic benefits of investing in sustainable and energy-efficient architecture?

Answer: Green buildings save money over time by using less energy and needing fewer repairs. They’re often worth more and attract better rents or sales. Governments may offer grants or tax breaks, too. Beyond the building, investing in green design creates jobs and reduces public costs linked to pollution or energy shortages. In short, sustainability makes good business sense.


From Sketch to Structure: Applied Architectural Math

1. Calculate the area of a rectangular floor that measures 15 m by 20 m.

Solution: Area = Length × Width = 15 m × 20 m = 300 m².

2. Convert a building’s width from 50 feet to meters. (1 foot = 0.3048 m)

Solution: Width in meters = 50 ft × 0.3048 m/ft = 15.24 m.

3. Determine the volume of a room that is 5 m long, 4 m wide, and 3 m high.

Solution: Volume = Length × Width × Height = 5 m × 4 m × 3 m = 60 m³.

4. A floor measures 120 m² and will be covered with square tiles each measuring 30 cm on a side. How many tiles are needed if 10% extra is added for wastage?

Solution: Tile area = 0.30 m × 0.30 m = 0.09 m². Tiles needed (ideal) = 120 m² / 0.09 m² ≈ 1333.33 → round up to 1334 tiles. Including 10% extra: Total tiles = 1334 × 1.10 ≈ 1467.4 → round up to 1468 tiles.

5. A wall measures 8 m in length and 3 m in height. If the cost to paint is $12 per m², what is the total painting cost?

Solution: Area = 8 m × 3 m = 24 m². Total cost = 24 m² × $12/m² = $288.

6. Calculate the volume of concrete required for a slab that covers 50 m² with a thickness of 0.15 m.

Solution: Volume = Area × Thickness = 50 m² × 0.15 m = 7.5 m³.

7. A scale drawing of a building has a scale of 1:100. If a room is shown as 4 cm on the drawing, what is its actual length in meters?

Solution: Actual length = 4 cm × 100 = 400 cm = 4 m.

8. A building casts a shadow 12 m long when the sun’s elevation angle is 30°. Estimate the height of the building using trigonometry.

Solution: tan(30°) = Height / Shadow → Height = 12 m × tan(30°) ≈ 12 × 0.577 = 6.924 m.

9. A facade is 25 m wide with windows covering a total area of 80 m². Calculate the window-to-wall ratio (as a percentage).

Solution: Assume facade height = 10 m → Total facade area = 25 m × 10 m = 250 m². Window-to-wall ratio = (80 m² / 250 m²) × 100 ≈ 32%.

10. Calculate the total length of baseboard required for a rectangular room that measures 6 m by 4 m, assuming baseboard is installed along all four walls.

Solution: Perimeter = 2 × (6 m + 4 m) = 2 × 10 m = 20 m.

11. A window has an area of 2 m² and a U-value of 2.5 W/(m²·K). If the temperature difference between inside and outside is 15 K, calculate the rate of heat loss through the window.

Solution: Heat loss = U × Area × ΔT = 2.5 × 2 × 15 = 75 W.

12. A wall measures 10 m in length and 3 m in height. If a standard brick measures 0.2 m × 0.1 m and the mortar adds 10%, estimate the number of bricks required.

Solution: Wall area = 10 × 3 = 30 m². Effective brick area = 0.02 m² × 1.10 = 0.022 m². Bricks needed = 30 / 0.022 ≈ 1364.

13. A building façade is 20 m long and 10 m high. Calculate its total area in square meters.

Solution: Area = 20 m × 10 m = 200 m².

14. If a window has a U-value of 2.5 W/(m²·K) and the temperature difference is 15 K, calculate the heat loss through a 2 m² window.

Solution: Heat loss = 2.5 × 2 × 15 = 75 W.

15. A solar panel has an area of 1.8 m² and an efficiency of 18%. If irradiance is 1000 W/m², calculate the electrical output.

Solution: Output = 0.18 × 1.8 × 1000 = 324 W.

16. A building’s HVAC heat exchanger transfers 5000 J of energy in 50 s. Calculate the heat transfer rate in watts.

Solution: Heat rate = 5000 J / 50 s = 100 W.

17. An energy audit finds 15,000 kWh heat lost yearly. Convert to joules. (1 kWh = 3.6×10⁶ J)

Solution: Energy = 15,000 × 3.6×10⁶ = 54×10⁹ J = 5.4×10¹⁰ J.

18. A heat pump has a COP of 4 and uses 2 kW. What is the total heat transferred?

Solution: Heat transferred = COP × Power = 4 × 2 = 8 kW.

19. A refrigeration cycle removes 1200 J of heat in 30 s. Calculate its capacity in watts.

Solution: Capacity = 1200 / 30 = 40 W.

Last updated:

Last updated: 15 Oct 2025