Prepare for University Studies & Career Advancement
Optical Instruments
Optical instruments extend what the human eye can see, record, enlarge, project, or measure. A simple lens may help us read fine print, while a carefully designed camera lens can focus a landscape onto a sensor. A microscope can reveal cells, a telescope can collect light from distant stars, and spectacles can correct how the eye focuses light. Each instrument is built on the same foundation: light travels, reflects, refracts, and forms images.
In basic ray diagrams, we often study one lens or one mirror at a time. Optical instruments show what happens when these ideas are combined for a practical purpose. A useful instrument must do more than form an image. It must form an image that is bright enough, sharp enough, large enough, correctly positioned, and suitable for the observer, screen, sensor, or measuring system.
This page connects geometrical optics with real devices such as cameras, projectors, magnifying glasses, microscopes, telescopes, spectacles, contact lenses, and the human eye. It helps students see that optical instruments are not separate topics to memorise, but practical combinations of image formation, magnification, focusing, aperture control, and optical design.
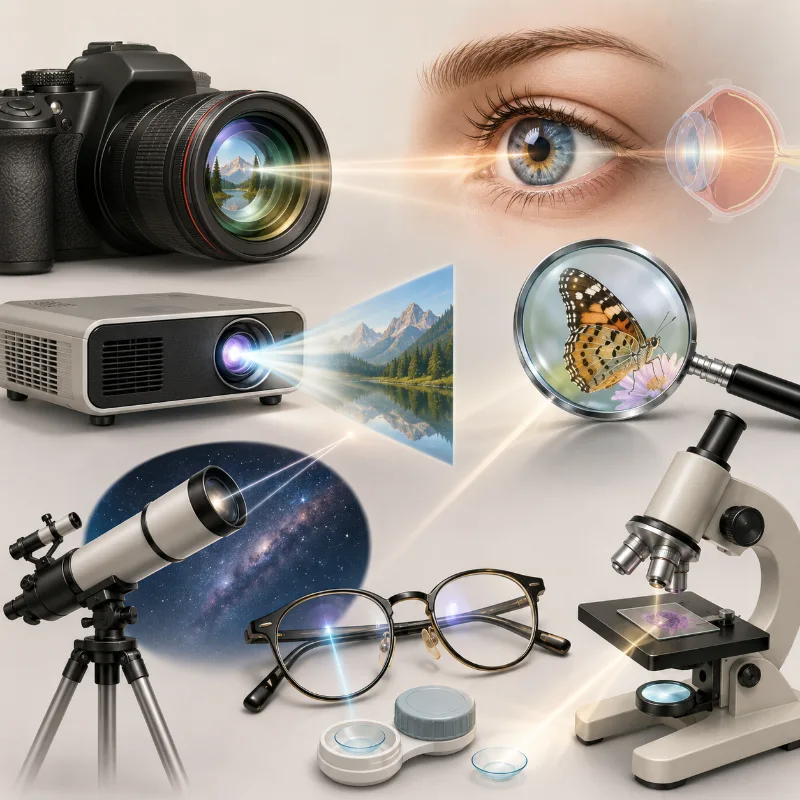
Optical instruments extend human vision by helping us record scenes, project images, magnify details, observe distant objects, and correct focusing in the eye.
This artist impression introduces optical instruments as practical applications of geometrical optics. It shows a camera, projector, telescope, microscope, magnifying glass, spectacles, contact lenses, and the human eye, with gentle light paths suggesting reflection, refraction, focusing, magnification, and image formation. The image helps students see that optical instruments are not separate devices to memorise, but connected examples of how light can be guided to see, record, enlarge, project, and measure the world more clearly.
How This Page Fits into Geometrical Optics
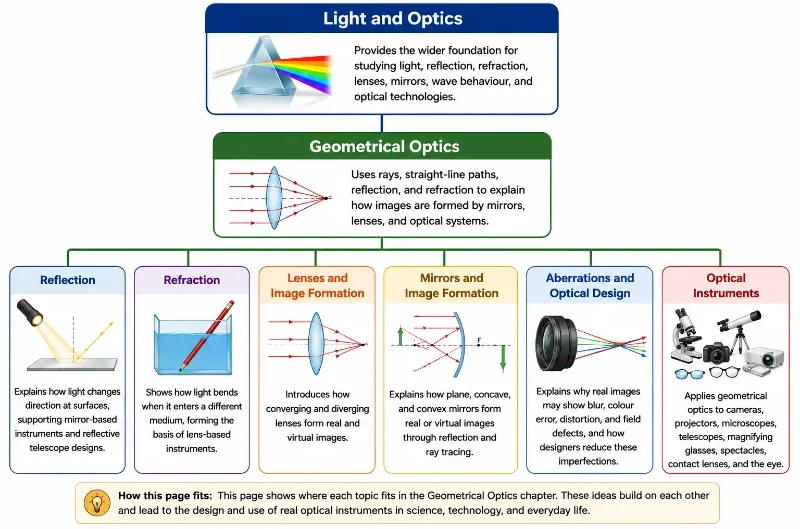
Optical instruments apply the ideas developed in reflection, refraction, lenses, mirrors, image formation, and optical design. Once students understand how rays form images, they can understand how real instruments guide light for seeing, recording, projecting, magnifying, and correcting vision.
Explains how plane, concave, and convex mirrors form real or virtual images through reflection and ray tracing.
This hierarchy chart shows Mirrors and Image Formation added as a key sub-page within the Geometrical Optics cluster.
This educational hierarchy chart presents the updated three-level structure for the Geometrical Optics cluster. Light and Optics appears as the top-level parent topic, followed by Geometrical Optics as the second-level topic. Six connected sub-pages branch from it: Reflection, Refraction, Lenses and Image Formation, Mirrors and Image Formation, Aberrations and Optical Design, and Optical Instruments. The chart helps students see how mirror image formation fits naturally alongside lens image formation, optical design, and real optical instruments.
The Context of Optical Instruments: History, Challenges, and Future
The integration of separate optical components into structured systems has expanded human capability from basic sight correction to viewing distant cosmic structures.
The Historical Journey
The earliest optical systems date back to the late 13th century, when artisans in Italy constructed the first wearable eyeglasses to correct presbyopia. A massive leap occurred around 1608 in the Netherlands, when lens grinders Hans Lippershey and Zacharias Janssen paired convex and concave lenses inside tubes, inventing the telescope and microscope. Galileo Galilei rapidly adapted this setup to reveal Jupiter’s moons, while Robert Hooke and Antonie van Leeuwenhoek optimized compound microscopes to discover living micro-organisms. The 19th and 20th centuries introduced photographic chemicals and electronic sensors, changing instruments from real-time viewing aids into permanent data-recording tools.
Contemporary Design Challenges
Modern instrument engineering focuses on resolution limits and physical scale limits. In microscopes, pushing for higher magnification reveals the **diffraction limit**, where light acts as a wave and blurs features smaller than roughly half its wavelength. In consumer electronics, smartphone makers face severe space limits; multi-element lens arrays must be micro-manufactured to sub-micron accuracy within a chassis less than 5 mm thick, all while managing geometric distortion and light transmission losses.
Future Horizons: Quantum Sensors and Super-Resolution Systems
The field is moving beyond classical limits via several key innovations:
Super-Resolution Microscopy: Technologies like STED (Stimulated Emission Depletion) bypass the classical diffraction limit entirely, allowing researchers to resolve biomolecules down to the nanometer scale.
Computational Space Arrays: Projects like the James Webb Space Telescope use multi-segment reflectors aligned by computer micro-actuators. Future instruments will combine arrays of small distributed satellites, using light interference across space to simulate massive telescope systems.
What Optical Instruments Really Are
An optical instrument is a system that controls light to help us see, measure, record, magnify, or project an image. Some instruments are very simple. A magnifying glass may use only one converging lens. Others are more complex. A microscope or camera lens may use several optical elements to improve sharpness, brightness, field of view, colour accuracy, and magnification.
The key idea is that an optical instrument has a purpose. A camera forms a real image on a sensor. A projector forms a real image on a screen. A magnifying glass forms a virtual enlarged image for the eye. A microscope magnifies tiny objects. A telescope gathers light from distant objects. Spectacles and contact lenses help the eye focus light correctly.
Therefore, optical instruments are not just collections of lenses and mirrors. They are designed systems. Their structure depends on what image is needed, where it must form, how large it should appear, how much light is available, and how clearly the final image must be seen or recorded.
From a Single Lens to an Optical System
A single lens can form an image, but many instruments need more than one optical element. One lens may collect light, another may magnify an intermediate image, and another may correct defects. The final result depends on how these elements work together.
For example, a simple microscope can be built from one lens, but a compound microscope uses an objective lens and an eyepiece. The objective forms a magnified image of the object, and the eyepiece allows the eye to view that image comfortably. Similarly, a telescope often uses an objective lens or mirror to collect light and an eyepiece to magnify the image for the observer.
This is why optical instruments are a natural next step after ray diagrams. The same ray rules still apply, but the system now has a practical goal: to make vision more useful.
Core Functions of Optical Instruments
Although optical instruments look different from one another, many perform a few common functions. Understanding these functions helps students compare cameras, microscopes, telescopes, projectors, and corrective lenses more easily.
Collecting Light
A larger aperture can collect more light, making faint objects easier to see or record. This is especially important in telescopes, cameras, and microscopes.
Focusing Light
Lenses and mirrors guide rays so that light from an object forms a sharp image at the correct position, such as on a sensor, screen, retina, or intermediate image plane.
Magnifying Detail
Magnifying instruments increase the apparent size of small or distant objects so that the eye or detector can resolve more useful detail.
Projecting Images
Projectors use lenses to form enlarged real images on screens, making small images visible to a group of viewers.
Correcting Vision
Spectacles and contact lenses modify the path of incoming light so that the eye can focus images properly on the retina.
Recording Images
Cameras and digital sensors convert focused optical images into stored visual information for photography, science, industry, and communication.
Key Parts of an Optical Instrument
Different instruments use different designs, but several terms appear repeatedly. These terms help describe how an instrument receives light, forms an image, and presents that image to the eye or detector.
Objective
The main lens or mirror that first collects light from the object. In microscopes and telescopes, the objective is especially important because it strongly affects brightness and resolution.
Eyepiece
A lens or lens group through which the observer looks. It often magnifies an intermediate image formed by the objective.
Aperture
The opening that controls how much light enters the instrument. A larger aperture admits more light but can make aberrations harder to control.
Image Plane
The position where a real image is formed, such as a camera sensor, photographic film, projection screen, or microscope image plane.
Focus
The adjustment that makes the image sharp by placing the image plane at the correct position relative to the lens or mirror system.
Field of View
The angular or spatial extent of the scene that can be seen or recorded through the instrument.
Magnification
The ratio that describes how much larger an image appears compared with the object, or compared with the unaided view.
Resolution
The ability of an instrument to distinguish small details or closely spaced objects.
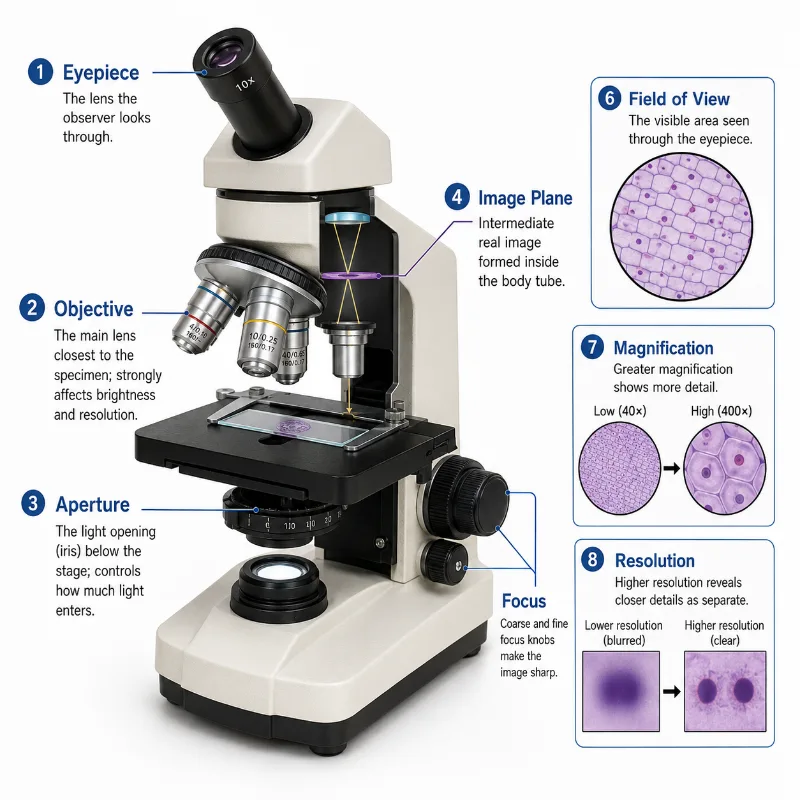
A compound microscope brings together lenses, aperture control, focusing, magnification, and resolution to reveal fine details in small specimens.
This educational diagram uses a compound optical microscope to explain the key parts of an optical instrument. It identifies the eyepiece, objective lenses, aperture, image plane, focus knobs, field of view, magnification, and resolution. The image helps students understand that a microscope does not simply enlarge objects; it must also collect light, form an image, adjust sharpness, control brightness, and resolve fine details clearly.
Cameras and Smartphone Cameras
A camera forms a real image on a light-sensitive surface. In a digital camera or smartphone, the image is recorded by an electronic sensor. The lens focuses light from the scene onto the sensor, while the aperture and exposure settings help control brightness.
The basic camera principle matches the converging lens ray diagrams studied in geometrical optics. Light from each point in the scene is brought to a corresponding point on the sensor. When focusing is correct, the image appears sharp. When the image plane is too near or too far from the lens, the image becomes blurred.
Modern smartphone cameras are especially interesting because they must fit into a very small space. Their lenses are tiny, so they often rely on a combination of optical design and software processing. The optical system forms the best possible image, while software improves sharpness, reduces noise, corrects distortion, and combines multiple exposures.
Why Cameras Need Focusing
Objects at different distances form images at different positions. A camera therefore needs a focusing mechanism. In many cameras, focusing changes the relative position of the lens and sensor. In smartphones, focusing may involve tiny lens movements or computational methods that improve the final image.
The goal is simple but important: the image formed by the lens must fall exactly on the sensor. If it falls in front of or behind the sensor, the recorded image appears soft.
Projectors
A projector works in the opposite direction from a camera. A camera takes a large scene and forms a smaller image on a sensor. A projector takes a small image from a display panel or film and forms a larger real image on a screen.
The projector lens must collect light from the small internal image and send it outward so that a sharp enlarged image appears on the screen. The screen is placed where the real image forms. If the projector is too near, too far, or incorrectly focused, the screen image becomes blurred.
Projection also reveals an important practical idea: brightness matters. A large projected image spreads light over a wide area, so the projector must provide enough light and the lens must transmit it efficiently. The design must balance brightness, sharpness, image size, distortion, and distance from the screen.
Magnifying Glasses
A magnifying glass is one of the simplest optical instruments. It uses a converging lens to make a nearby object appear larger. When the object is placed within the focal length of the lens, the lens forms a virtual, upright, magnified image.
The magnifying glass does not usually project the image onto a screen. Instead, it sends rays into the eye in such a way that the object appears larger and easier to examine. This is why a magnifying glass is useful for reading fine print, inspecting small objects, and introducing students to the idea of angular magnification.
The key point is that magnification is not only about image height on paper. It is also about how large an object appears to the eye. A small object close to the eye may appear large, but the eye cannot focus comfortably below a certain distance (the near point, usually taken as 25 cm). A magnifying glass helps the eye view the object with greater apparent size while keeping the image comfortable to see.
Microscopes
A microscope allows us to see details too small for the unaided eye. A compound microscope uses two main lens systems: the objective and the eyepiece. The objective lens is placed close to the specimen and forms a magnified real image. The eyepiece then magnifies this intermediate image for the observer.
The microscope is powerful because it combines magnification with resolution. Magnification alone is not enough. If the instrument cannot resolve fine details, the image may be larger but not more informative. This is why microscope design pays careful attention to objective quality, numerical aperture, illumination, contrast, and aberration correction.
In school-level geometrical optics, microscope ray diagrams help students understand how one lens can form an intermediate image and another lens can enlarge it further. In real microscopes, the optical design is more advanced, but the basic idea remains: guide light from a small object so that tiny details become visible.
Compound Microscope Magnification
In a simplified treatment, the total magnification of a compound microscope is calculated by multiplying the linear magnification of the objective by the angular magnification of the eyepiece:
$$M = M_o M_e$$
Here, Mo is the magnification of the objective and Me is the magnification of the eyepiece. For example, a 40× objective used with a 10× eyepiece gives a total magnification of 400×.
Telescopes
A telescope is designed to observe distant objects. In astronomy, telescopes collect light from stars, planets, nebulae, and galaxies. Since many astronomical objects are faint, light-gathering ability is extremely important. This is why large telescopes have large objective lenses or mirrors.
A simple refracting telescope uses an objective lens to form a real image of a distant object. An eyepiece then magnifies this image for the observer. A reflecting telescope uses a mirror as the main light-collecting element. Both designs use geometrical optics principles, but in different physical arrangements.
The telescope does not make stars physically larger. Instead, it collects more light and increases the apparent angular size or detail of distant objects. Good telescope design must also control aberrations, alignment, stability, field of view, and atmospheric limitations.
Angular Magnification of a Simple Telescope
For a simple astronomical telescope in normal adjustment (where the intermediate image falls at the focal points of both lenses), the angular magnification is calculated by:
$$M = \frac{f_o}{f_e}$$
Here, fo is the focal length of the objective and fe is the focal length of the eyepiece. A longer objective focal length and a shorter eyepiece focal length give greater angular magnification, although brightness, field of view, and image stability must also be considered.
Spectacles, Contact Lenses, and the Human Eye
The human eye is itself an optical instrument. The cornea and lens focus light onto the retina, where light-sensitive cells begin the process of vision. When the eye focuses correctly, light from an object forms a sharp image on the retina.
Vision problems often occur when the eye focuses light at the wrong position. In short-sightedness (myopia), distant objects focus in front of the retina. In long-sightedness (hyperopia), nearby objects require more focusing power than the eye can provide, causing the focus point to fall behind the retina. Spectacles and contact lenses correct these problems by changing the path of light before it enters the eye.
A diverging lens helps correct short-sightedness by spreading incoming rays slightly before they enter the eye. A converging lens helps correct long-sightedness by adding focusing power. Contact lenses perform a similar optical role but sit directly on the surface of the eye.
Machine Vision and Scientific Imaging
Optical instruments are also used by machines. In factories, cameras inspect products, check alignment, read codes, measure dimensions, and detect defects. In laboratories, optical systems support measurement, imaging, and analysis. These applications are often called machine vision or scientific imaging.
In machine vision, a clear image is part of a decision-making process. If a camera measures the position of a component, distortion can cause errors. If the lens blurs small defects, the system may miss them. If lighting is uneven, the image may be difficult for software to interpret.
This shows how geometrical optics connects with engineering. A good optical instrument must match the task. The lens, illumination, sensor, field of view, working distance, resolution, and software must all work together.
Comparing Common Optical Instruments
Instrument
Main Purpose
Image Type or Output
Key Optical Idea
Camera
Records a scene
Real image on a sensor or film
Focusing light onto an image plane
Projector
Displays a small image on a large screen
Real enlarged image on a screen
Projection and magnification
Magnifying Glass
Makes nearby objects appear larger
Virtual, upright, magnified image
Angular magnification
Microscope
Reveals tiny details
Magnified image viewed through eyepiece or camera
Objective and eyepiece magnification
Telescope
Observes distant objects
Magnified angular view of distant objects
Light collection and angular magnification
Spectacles
Corrects vision
Helps the eye focus image on retina
Pre-adjusting rays before they enter the eye
Machine Vision System
Inspects or measures objects
Image analysed by software
Accurate imaging for measurement and decision-making
Important Equations in Optical Instruments
Optical instruments use the same equations introduced in lens and image formation. The equations are useful, but they should always be interpreted together with ray diagrams and the purpose of the instrument.
Thin Lens Equation
$$\frac{1}{f} = \frac{1}{u} + \frac{1}{v}$$
Here, f is the focal length, u is the object distance, and v is the image distance. This equation helps locate the image formed by a lens.
Linear Magnification
$$m = \frac{h_i}{h_o} = \frac{v}{u}$$
Here, hi is the image height and ho is the object height. This relation compares the size of the image with the size of the object.
Compound Microscope Magnification
$$M = M_o M_e$$
The total magnification of a compound microscope is the product of the objective magnification and the eyepiece magnification.
Simple Telescope Angular Magnification
$$M = \frac{f_o}{f_e}$$
In a simplified telescope model, angular magnification depends on the ratio of the objective focal length to the eyepiece focal length.
Rigorous Technical Worked Examples
Worked Example 1: Image Distance in a Camera
Problem: A camera lens has a focal length of 50 mm. A very distant object is photographed. Where is the image formed approximately?
Solution:
Using the thin lens equation:
$$\frac{1}{f} = \frac{1}{u} + \frac{1}{v}$$
When the object distance u is extremely large ($u \rightarrow \infty$), the term $1/u$ approaches 0:
$$\frac{1}{f} = 0 + \frac{1}{v} \Rightarrow v \approx f$$
$$v = 50\text{ mm}$$
Answer: The image forms 50 mm behind the lens, directly on the focal plane.
Worked Example 2: Microscope Magnification
Problem: A microscope uses a 40× objective and a 10× eyepiece. Estimate the total magnification.
Solution:
Using the compound system magnification rule:
$$M = M_o M_e$$
$$M = 40 \times 10 = 400$$
Answer: The total system magnification is 400×.
Worked Example 3: Telescope Magnification
Problem: A simple telescope has an objective focal length of 800 mm and an eyepiece focal length of 20 mm. Estimate the angular magnification.
Solution:
Using the angular telescope magnification formula:
$$M = \frac{f_o}{f_e}$$
$$M = \frac{800\text{ mm}}{20\text{ mm}} = 40$$
Answer: The telescope provides an angular magnification of 40×.
Worked Example 4: Projector Image Size
Problem: A projector magnifies an image by a factor of 20 relative to its internal display panel. If the internal panel is 6 cm wide, how wide is the projected image on the screen?
Problem: A camera sensor receives an image that is 12 mm high from an object whose actual height is 1.8 m. Express the magnification as a decimal using consistent units.
Answer: The calculated decimal magnification is approximately 0.0067.
Real-World Applications
Optical instruments are used wherever people need to see more clearly, record information, enlarge details, project images, or make accurate measurements. Their importance extends across education, medicine, engineering, communication, astronomy, manufacturing, and daily life.
Education
Projectors, document cameras, microscopes, and demonstration lenses help students connect abstract ray diagrams with visible optical effects.
Medicine and Healthcare
Microscopes, endoscopes, ophthalmoscopes, and imaging systems support diagnosis, surgery, laboratory testing, and eye care.
Astronomy
Telescopes collect faint light from distant objects and allow astronomers to observe planets, stars, nebulae, galaxies, and cosmic events.
Photography and Communication
Cameras and smartphone lenses allow people to record, share, analyse, and communicate visual information.
Manufacturing
Machine vision systems inspect products, guide robots, measure components, and detect defects in automated production.
Vision Correction
Spectacles and contact lenses help people see clearly by correcting how light is focused by the eye.
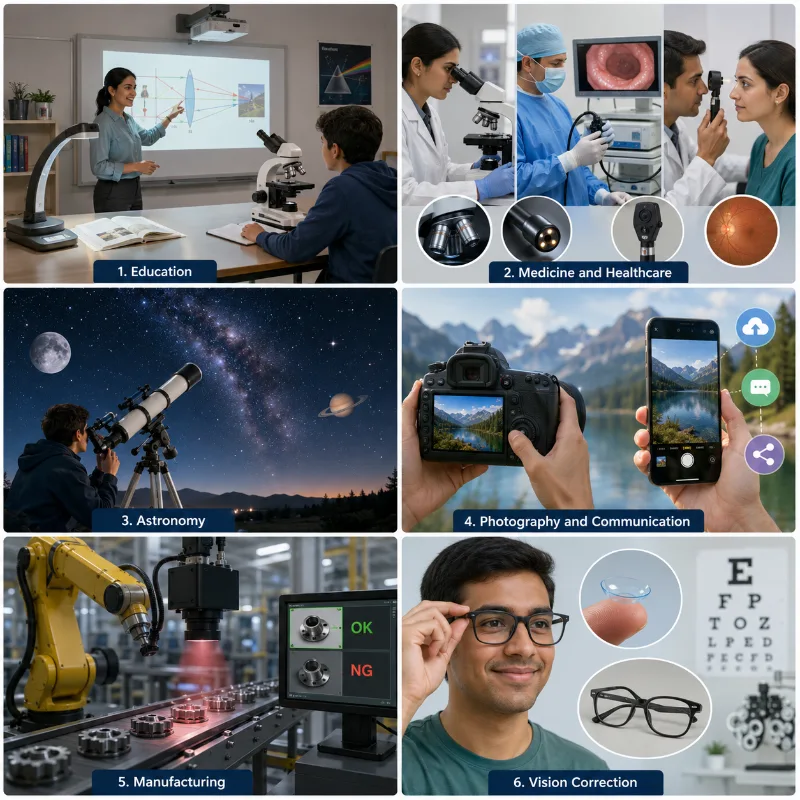
Optical instruments support learning, diagnosis, observation, communication, industrial inspection, and clearer vision across many areas of life.
This six-panel artist impression shows real-world applications of optical instruments. The education panel shows classroom use of a projector, document camera, and microscope to explain optical ideas. The medicine and healthcare panel shows instruments such as a microscope, endoscope, and eye examination tools supporting diagnosis and care. The astronomy panel shows a telescope used to observe the night sky. The photography and communication panel shows a camera and smartphone capturing and sharing images. The manufacturing panel shows a machine vision system inspecting components on an automated production line. The vision correction panel shows spectacles and contact lenses helping people see clearly by correcting how light is focused by the eye.
Common Misconceptions about Optical Instruments
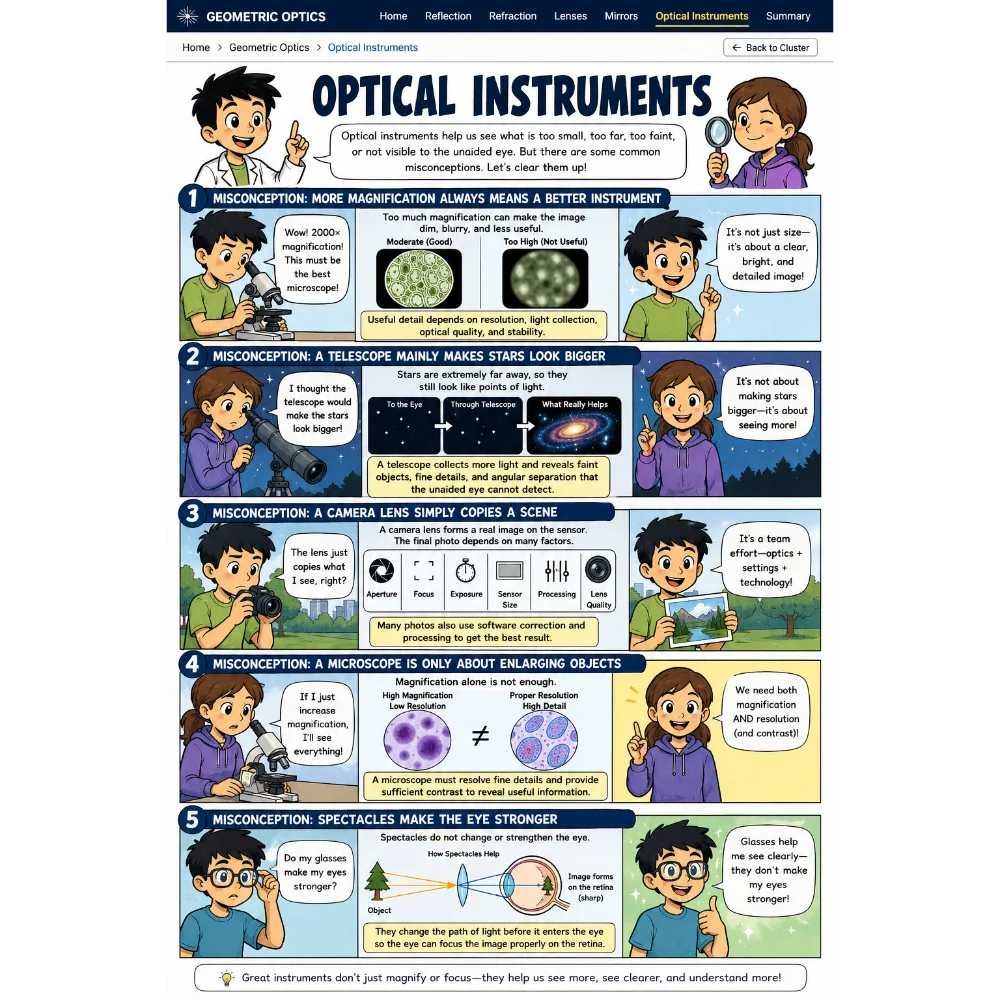
Misconception 1: More Magnification Always Means a Better Instrument
High magnification is useful only when the image remains sharp and bright enough. A microscope or telescope with excessive magnification produces a larger but dimmer or blurrier image. Useful detail depends on resolution, light collection, optical quality, and structural stability.
Misconception 2: A Telescope Mainly Makes Stars Look Bigger
Stars are so far away that they remain point-like even through powerful telescopes. A telescope is valuable because its large aperture collects light to reveal faint objects, fine details, and angular separation that the unaided eye cannot detect.
Misconception 3: A Camera Lens Simply Copies a Scene
A camera lens forms a real image by focusing light onto a sensor. The final photograph depends on aperture choice, focus settings, exposure time, sensor size, sensor processing, lens element configurations, and software correction.
Misconception 4: A Microscope Is Only About Enlarging Objects
Magnification alone is not enough. A microscope must resolve fine details. Without sufficient numerical aperture and resolution, an enlarged image does not reveal new information; it simply produces an enlarged blur.
Misconception 5: Spectacles Make the Eye Stronger
Spectacles do not make the eye physically stronger or alter eye tissue. They reshape the path of incoming light before it hits the cornea so that the eye’s natural lens can focus the image exactly on the retina.
Optical instruments are not just about making things bigger; they help us see more clearly by balancing magnification, brightness, resolution, focus, and image correction.
This educational comic highlights five common misconceptions about optical instruments. It explains why more magnification does not always produce a better image, why telescopes mainly collect more light rather than simply making stars bigger, why camera lenses do more than copy a scene, why microscopes need both magnification and resolution, and why spectacles correct the path of light without making the eye physically stronger. The comic uses student-friendly scenes to connect geometrical optics with real instruments such as microscopes, telescopes, cameras, and spectacles.
Quick Check: Concepts and Calculations
1. An astronomical telescope has an objective focal length of 120 cm and an eyepiece focal length of 3.0 cm. What is the total length of the telescope tube when adjusted for normal viewing?
A. 40 cm
B. 117 cm
C. 123 cm
D. 360 cm
Answer: C. In normal adjustment, the intermediate image lies at the focal points of both the objective lens and the eyepiece. Therefore, the distance between the two lenses is the sum of their focal lengths: $$L = f_o + f_e = 120\text{ cm} + 3.0\text{ cm} = 123\text{ cm}$$
2. A short-sighted person cannot focus on objects beyond 50 cm. What type of corrective lens is required to view very distant objects clearly?
A. A converging lens with a focal length of +50 cm.
B. A diverging lens with a focal length of -50 cm.
C. A cylindrical lens with zero power.
D. A flat lens with an antireflective coating.
Answer: B. Short-sightedness (myopia) requires a diverging lens to diverge incoming parallel rays so they appear to come from the person’s far point. The required focal length matches the far point distance, which is -50 cm (or a lens power of -2.0 dioptres).
Review Questions and Answers
1. What is an optical instrument?
Answer: An optical instrument is a device or system that controls light to help us see, record, project, magnify, correct, or measure images.
2. What type of image does a camera lens form on a sensor?
Answer: A camera lens forms a real, inverted image on the sensor plane.
3. Why does a projector need a screen?
Answer: A projector forms a real image. A physical screen must be placed at the image plane intersection coordinate so the rays can scatter and become visible to viewers.
4. What type of image does a magnifying glass usually form when used correctly?
Answer: It forms a virtual, upright, magnified image on the same side of the lens as the object.
5. What are the two main lens systems in a compound microscope?
Answer: The two main systems are the objective lens (placed near the specimen) and the eyepiece lens (placed near the observer’s eye).
6. Why is aperture important in a telescope?
Answer: Aperture size determines light-gathering power ($A \propto D^2$). A larger diameter aperture captures more photons, allowing faint, distant celestial structures to be resolved.
7. How do spectacles help vision?
Answer: They alter the convergence or divergence of incoming wavefronts, shifting the final focus point so it lands precisely on the retina layer.
8. Why is resolution important in microscopes?
Answer: Resolution defines the ability to distinguish two closely spaced features as separate points. Magnification without high resolution yields only an enlarged blur.
9. What is the role of the eyepiece in many optical instruments?
Answer: The eyepiece acts as a magnifier for the intermediate real image projected by the primary objective lens system.
10. Why do many optical instruments require careful design?
Answer: They must balance trade-offs among sharpness, brightness, magnification, field of view, size, cost, comfort, and control of optical aberrations.
Thought-Provoking Questions with Answers
1. Why is an optical instrument not judged only by magnification?
Answer: Magnification only changes image scale. A useful instrument must also provide enough brightness, contrast, resolution, and structural stability. A highly magnified but dark and blurry image carries less data than a sharp, smaller one.
2. Why might a smartphone camera need software correction?
Answer: Due to physical thickness limits, smartphone lenses are small and experience geometric aberrations. Post-processing software corrects distortion, lateral chromatic fringing, exposure imbalances, and digital noise after capture.
3. Why do telescopes often use large lenses or mirrors?
Answer: Distant astronomical targets emit very few photons that reach Earth. Large apertures maximize the light collection area to resolve faint structures like nebulae and distant galaxies.
4. Why does a microscope need good illumination?
Answer: High-magnification systems spread a tiny slice of light over a much larger area, which reduces image brightness. High-intensity illumination maintains contrast and visibility.
5. How does studying optical instruments change the way we understand ray diagrams?
Answer: It changes ray diagrams from abstract geometry into practical engineering blueprints, showing how real devices manipulate light fields to expand human vision.
Numerical Problems with Answers
Problem 1: A microscope has a 20× objective and a 10× eyepiece. Find the total magnification.
Solution:
$$M = M_o M_e = 20 \times 10 = 200$$
Answer: The total magnification is 200×.
Problem 2: A telescope has an objective focal length of 1000 mm and an eyepiece focal length of 25 mm. Find the angular magnification.
Problem 4: A camera lens has a focal length of 35 mm. For a very distant object, where is the image formed approximately?
Solution:
For an object at a great distance, $1/u \rightarrow 0$. Using $1/f = 1/u + 1/v$:
$$\frac{1}{v} \approx \frac{1}{f} \Rightarrow v \approx 35\text{ mm}$$
Answer: The image forms approximately 35 mm behind the lens center.
Problem 5: A camera sensor receives an image that is 12 mm high from an object whose actual height is 1.8 m. Express the magnification as a decimal. Use consistent units.
Solution:
Convert units to millimeters: $1.8\text{ m} = 1800\text{ mm}$. Apply the linear magnification equation:
Optical instruments use reflection, refraction, lenses, mirrors, apertures, sensors, screens, and the human eye to form useful images. Some instruments, such as magnifying glasses and spectacles, are simple in principle. Others, such as microscopes, telescopes, projectors, and modern cameras, combine several optical ideas in one system.
The study of optical instruments shows why geometrical optics matters beyond classroom ray diagrams. It explains how light is collected, focused, magnified, projected, recorded, and corrected. It also shows that good optical design involves trade-offs among sharpness, brightness, magnification, resolution, field of view, cost, size, and practical usability.
Reflection Question
If an optical instrument must balance magnification, sharpness, brightness, size, and cost, which quality would you prioritise for a school microscope, a smartphone camera, and an astronomical telescope?